nicknochnack/ANPRwithPython
Contribute to nicknochnack/ANPRwithPython development by creating an account on GitHub.
github.com
0. Install and Import Dependencies
pip install easyocr
pip install imutils# OMP: ERROR #15: Initializing libiomp5md.dll, but found libiomp5md.dll already initialized.
import os
os.environ['KMP_DUPLICATE_LIB_OK']='True'
import cv2
from matplotlib import pyplot as plt
import numpy as np
import imutils
import easyocr
1. Read Image, Gray scale
img = cv2.imread("image3.jpg")
gray = cv2.cvtColor(img, cv2.COLOR_BGR2GRAY)
plt.imshow(cv2.cvtColor(gray, cv2.COLOR_BGR2RGB))
2. Apply filter and find edges for localization
bfilter = cv2.bilateralFilter(gray, 11, 17, 17) # Noise Reduction
edged = cv2.Canny(bfilter, 30, 200) # Edge detection
plt.imshow(cv2.cvtColor(edged, cv2.COLOR_BGR2RGB))
3. Find Contours and Apply Mask
# 컨투어 찾기
keypoints = cv2.findContours(edged.copy(), cv2.RETR_TREE, cv2.CHAIN_APPROX_SIMPLE)
contours = imutils.grab_contours(keypoints)
contours = sorted(contours, key=cv2.contourArea, reverse=True)[:10]
# 컨투어 폐곡선으로 근사했을 때 꼭짓점 개수가 4개인 결과를 location에 저장
location = None
for contour in contours:
approx = cv2.approxPolyDP(contour, 10, True)
if len(approx) == 4:
location = approx
break# 해당 꼭짓점을 이었을 때 생기는 영역을 제외한 나머지 부분을 0으로 초기화
mask = np.zeros(gray.shape, np.uint8)
new_image = cv2.drawContours(mask, [location], 0, 255, -1)
new_image = cv2.bitwise_and(img, img, mask=mask)
plt.imshow(cv2.cvtColor(new_image, cv2.COLOR_BGR2RGB))
# ROI로 확대
(x, y) = np.where(mask == 255)
(x1, y1) = (np.min(x), np.min(y))
(x2, y2) = (np.max(x), np.max(y))
cropped_image = gray[x1:x2+1, y1:y2+1]
plt.imshow(cv2.cvtColor(cropped_image, cv2.COLOR_BGR2RGB))
4. Use Easy OCR to Read Text
reader = easyocr.Reader(["en"])
result = reader.readtext(cropped_image)
result
5. Render Result
text = result[0][-2]
font = cv2.FONT_HERSHEY_SIMPLEX
res = cv2.putText(img, text=text, org = (approx[0][0][0], approx[1][0][1] + 60), fontFace = font, fontScale = 1, color = (0, 255, 0), thickness = 2, lineType = cv2.LINE_AA)
res = cv2.rectangle(img, tuple(approx[0][0]), tuple(approx[2][0]), (0, 255, 0), 3)
plt.imshow(cv2.cvtColor(res, cv2.COLOR_BGR2RGB))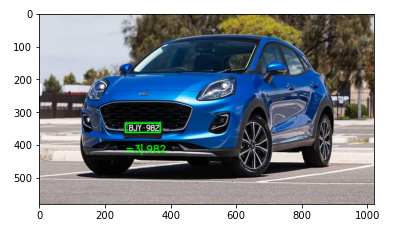
728x90
반응형
'딥러닝 > 컴퓨터비전' 카테고리의 다른 글
| [Computer Vision] Pre-trained Models 정리 (0) | 2023.01.19 |
|---|---|
| [Computer Vision] Basic Convolution Method (0) | 2023.01.19 |
| [Computer Vision] CNN 정리 (1) | 2023.01.19 |
| Easy OCR 라이브러리 (0) | 2021.03.14 |

최근댓글